Shifts
Shifts are used for tracking early or late clock ins/outs, restricting early clock ins and late clock outs, and hiding Break and Lunch buttons until designated times.
![]() Important: Shifts are meant for static, recurring schedules. Employees can only be assigned to one Shift.
Important: Shifts are meant for static, recurring schedules. Employees can only be assigned to one Shift.
Setup menu: Shifts
Step One: Shift Settings
Tracking Early or Late Clock Ins/Outs

Shift and Times: Create one or more Shifts and set the In Time and Out Time
Tracking:
- Choose what to track in the Tracking section.
- Choose "Email when tardy" if you want to be notified each time there's a Shift discrepancy.
- Grace Period represents what constitutes Early and Late. Example: In this example, an employee who clocks in at 9:08am will not be considered late, as it's within the 10-minute grace period.
Restrict Early Clock Ins
*Not fully compatible with the use of readers
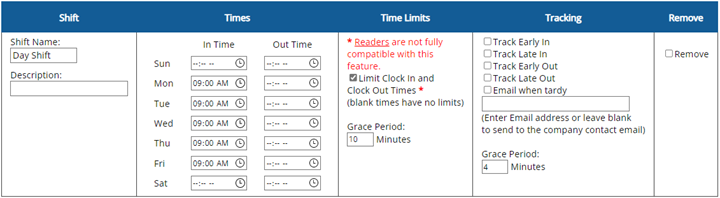
Shift and Times: Create one or more Shifts and set the In Time. Setting Out Time will restrict the employee from clocking out after a certain point.
Time Limits: Check the box in the Time Limits section. The Grace Period will allow the employee to clock in within that time period. Example: In this example, an employee would not be able to clock in at 8:49, but would be able to clock in at 8:50.
*Not compatible with the use of readers
*First make sure you have Breaks or Lunch set up in Features: Breaks / Lunch, and that they’re assigned to employees in Features: Assign Projects or Breaks.
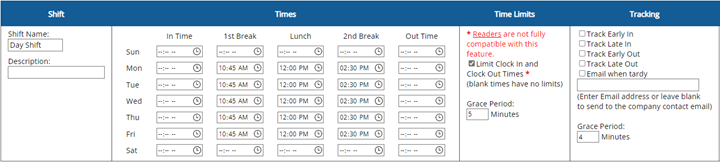
Shift and Times: Create one or more Shifts and set the 1st Break / Lunch / 2nd Break times. Because you will be using the Time Limits feature, only use the In Time and Out Time columns if you want employees blocked from clocking in too early and/or late.
1st Break and 2nd Break refers to the Pay Type column in Features: Breaks / Lunch.
Time Limits: Check the box in the Time Limits section. Unlike restricting early clock ins/outs, the Grace Period does not apply to Break or Lunch times. Example: In this example, the 1st Break button will not show as an option to teh employee until exactly 10:45am.
Step Two: Assignment
Setup menu: Assign Shifts
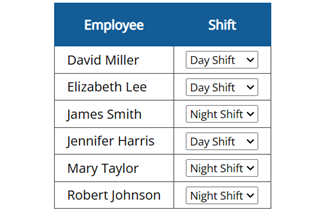
Each Employee can be assigned to one shift.
Step Three: View in Reports
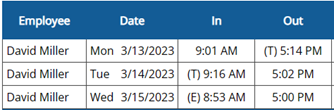
The Tracking column in Shift Setup will track punches in reports as (E) for early and (T) for tardy.
Reports menu: Shift Comparison
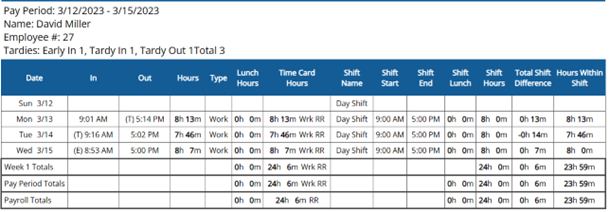
The Shift Comparison Report will display how many earlies and tardies an employee has had, as well as hours worked within the Shift and total Shift differential.
FAQ
How can I restrict early clock ins without restricting Break or Lunch times?
Follow the Restrict Early Clock Ins instructions, and just leave the Breaks and Lunches columns empty.
How can I restrict early clock ins without restricting when employees can clock out?
Follow the Restrict Early Clock Ins instructions and make sure to only use the “In Time” column.
What happens if I set up the Restrict Early Clock Ins instructions, and my employees clock in early using a fingerprint reader?
The reader will say “Punch accepted,” but will not clock the employee in. It will then send an email to the Admin about the attempted clock in.
What happens if I set up the Hiding Lunch/Break Buttons instructions, and my employees use buttons on a fingerprint reader to clock in and out of lunch?
This will have no effect. Employees will not be restricted from using the Break or Lunch buttons on the reader.
I set up Shifts but it isn’t working…
Make sure you have assigned a Shift to your employees in the Setup menu: Assign Shifts.
Watch Video: