Full PTO Setup
This help file will take you through all of the steps of setting up Paid Time Off for your employees. Every company has different policies for Paid Time Off. This will cover the most common setups.
Included will be:
- Creating PTO Categories
- Assigning to Employees
- Setting up Accrual Rules
- Adjusting Accrual Schedule & Current Balances
Important:
It would be in your best interest to complete this setup process in one day. At night when the PTO service runs, whatever you have set up so far will go ahead and populate. If unfinished, you may need to delete incorrect accruals later.
Let’s start out by making sure you’re in the right place…

Step One: Creating PTO Categories
Features menu: PTO Categories
Common PTO Categories could be: Holiday, Sick, Vacation, Bereavement.
Create categories for each type of PTO, saving between each.

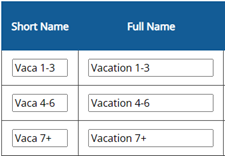
If a category changes accrual rate based on length of employment, you will want to create multiple categories for each accrual rate. In the below example, Employees get 40 hours from year 1-3, 80 years from years 4-6, and 120 hours after their 7th anniversary.

Short Name
Both Short Name and Full Name are used in reports.
Internal Note
Internal note only appears on this page.
Export Earning Code
Add an export earning code (aka pay code) if you are exporting your reports to payroll. Pay codes are either provided from your payroll company, or are set up by you in the payroll software.
For PTO types that are split into multiple categories, use the same export code for each.
Display PTO Payroll Hours
List Separately recommended. Choose Grouped only if you want reports to show all PTO as PTO rather than by the category name.
Include in OT Calculations
Most PTO is not included in overtime calculations. But if your PTO counts toward overtime, choose Included.
Step Two: Assigning to Employees
Features menu: PTO Assignment and Accrual
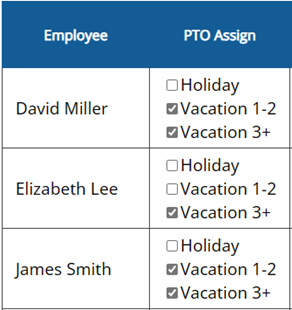
Categories that don't accrue, like Holiday, Bereavement, and Jury Duty...
We often suggest not assigning these categories (e.g., the unchecked David Miller Holiday option), unless you want employees to enter their own usage.
As long as the category exists, the Admin is always able to apply usage to any employee.
If any employee no longer qualifies for a category, there may be no need to assign it (e.g., the unchecked Elizabeth Lee Vacation 1-2 option).
But if an employee hasn't yet qualified for a category, they should be assigned to it so the system can automatically move them into the next category once they qualify (e.g., the checked James Smith Vacation 3+ option).
Once you have checked the boxes for assignment, Save Changes at the bottom, then the next column will be available.
Step Three: Setting up Accrual Rules
Part 1: How Often
The next column on the Assignment and Accrual page allows you to determine how often your categories will accrue. Most choose Annually, or line the accruals up with pay periods. This is a common setup:
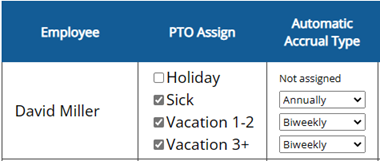

Important: Don't abandon the process now! If you leave it this way overnight, the system will start posting 1-hour accruals for everyone!
Part 2: How Much
Again, Save Changes at the bottom and the next column will be available.
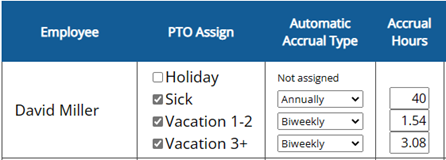
Now you’ll apply the amount of accrual. For however often the category accrues, this is the amount it will post.
Accrual Hours
For Annual accruals, you can enter the full amount of hours the employee will receive in bulk once a year.
For all other accruals, enter the accrual rate broken down by the period you have chosen.
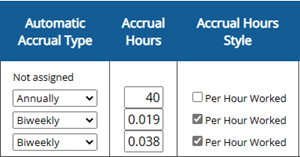
Accrual Hours Style
Per Hours Worked is only used if you want to accrue a fraction of an hour for every hour worked.
If you know how many total hours the employees should get for the year, but don't know how to calculate the accrual rate, try this method:

Part 3: Optional Accrual Requirements and Restrictions
Minimum Work Hours Required
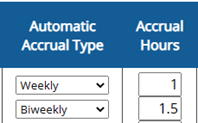
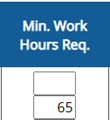
* not commonly used
Only available for Weekly and Biweekly accrual types.
When using this setting, the system will reference how many hours the employee worked in the period (7 days for Weekly, 14 days for Biweekly), and will determine whether or not the employee qualifies for the accrual.
For example, if you enter 65 hours minimum on a Biweekly accrual, and the employee only works 62 hours in the pay period, the employee will not receive an accrual for the period.
Maximum PTO Hours Allowed


* somewhat commonly used
Used to control how many hours can be held in the employe's PTO bucket.
Annual Accruals — If unused hours are carried over into the new yer, the new year's accrual will be limited to not exceed the max hours.
Non-Annual Accruals — If the employee has reached their max hours allowed, the system will stop accruing. When PTO hours are used and the balance falls below the max, accruals will resume.
For example, for an annual accrual of 40 hours with a Max PTO Hours Allowed of 60... If 35 unused hours from the previous year carries over, the new year's accrual will be limited to 25 hours.
Maximum Yearly Accrual


* not commonly used
Used to limit the total amount of hours accrued within the year.
Only useful if the accrual rate is larger than it should be.
For example, employees get 40 hours per year, but accrue Biweekly. The Admin doesn't want the standard Biweekly accrual rate of 1.54 (perhaps he would rather accruals and usage be entered in whole numbers), so he enters "2" instead of "1.54." With no Max. Yearly Accrual, the total for the year would be 52 hours. By entering "40" as a max, the accruals stop completely once the 40 hours are reached, and won't resume until the next year.
Maximum Carryover


* commonly used
Used to limit how many unused hours can be carried over into the new year.
0 = No carryover, all unused hours are lost
blank = No limit, all unused hours are carried over
other = Whatever value is entered is the maximum amount that will carry over
For example, on the Annual accrual with no Maximum Carryover, the employee has 26 unused hours at the end of the year. When the year turns over, all 26 hours are carried over, a new 40-hour accrual posts, and the employee's balance is 66.
On the Monthly accrual with 0 Maximum Carryover, the employee has 5 unused hours at the end of the year. When the year turns over, the 5 hours are removed, a new 2-hour accrual posts, and the employee's balance is 2.
Part 4: Auto Accrual Adjustment
For PTO types that...
- don’t start accruing until the employee has been with the company for X months.
- change accrual rate based on how long the employee has been with the company.

* commonly used
Employed Minimum Months
Once the employee completes this many months, the category will start accruing.
Employed Maximum Months
Once the employee completes this many months, the category will stop accruing.
Understanding Min and Max Months
(Skip if you just want to get to the point!)

![]()
If an employee moves from Vaca-1 to Vaca-2 at their 1-year anniversary, you might be inclined to enter "12" in the Max Months...
But here's why you shouldn't!

![]()
By enter "11" in Max Months, you are telling the system that the last accrual that should post for that category is when the employee has completed 11 months, and is starting their 12th month.
By entering "12" in Min Months for the new category, you're telling the system that the employee should get their first accrual after they have completed 12 months and are starting their 13th month (aka their 1-year anniversary).
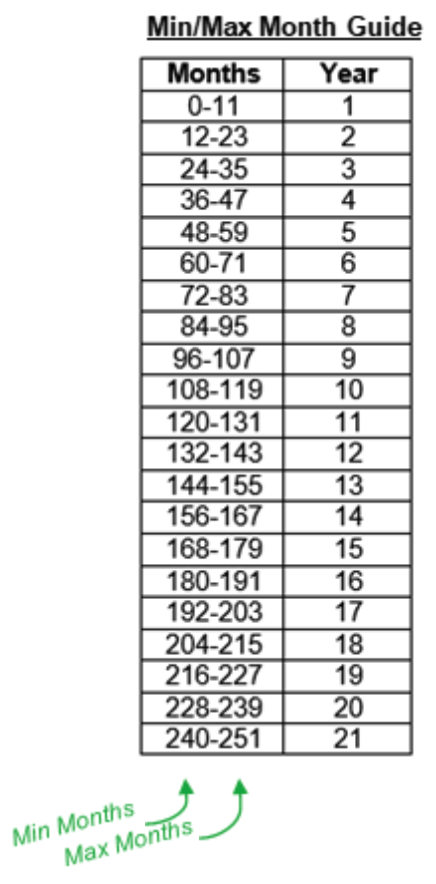


For example, employee will be eligible for Sick time after 3 months. There is no Max needed since the employee will continue getting that rate throughout their employment.
Employee is eligible for Vacation at the time of hire, so there is no Min Month. The Max Month is set to 23 so that the employee can move to the next category after 24 months (3-year anniversary). The Max Month on the middle category is 47 so that the employee can start the last category after 48 months (5-year anniversary). The employee will continue at the last PTO rate, so no Max Month is needed.
Tip:
When getting set up, you don't have to assign categories that an employee has already graduated from, but you should definitely assign future categories! That way, the system can move them automatically when they're eligible.
After setting up accrual rules, the PTO Balances page should show all "N/A's." Before the system applies the new settings, you can make adjustments to ensure accruals don't start posting on the wrong schedule.
Features menu: PTO Balances

The very first thing you need to know is… don’t Save Changes! Once you click Save Changes on this page, all of the accruals will post starting at the beginning of the year.
We will come back to this page. For now, we will use the PTO Accrual Edit page.
Step Four: Adjusting Accrual Schedule and Current Balances
Features menu: PTO Accrual Edit
If no adjustments are made, accruals would start populating from January 1 of the current year.
By entering the first accrual manually, you can control the schedule AND the current balance.

Accrual Date
Enter the day that will set the future schedule. For example, first day of the current pay period.
Hours Earned
As the first "accrual," enter the employee's current balance.
Entry Notes (optional)
It may be helpful to notate this is the employee's starting balance.
The LAST accrual on the list will override the schedule.
Because the first accrual on the list is also the last, we can utilize it to determine our accrual schedule.
If you ever add an extra accrual, make sure to repeat the same date as the last accrual, or enter a date earlier than the last accrual. Otherwise, accruals will start posting on the wrong days.
(Annual accruals are the only exception to this rule.)
Part 1: What Accrual Date to Enter
Biweekly — the first day of the month
If you enter this...

the system will do this (note the dates)...

Semimonthly — the first day of the month
If you enter this...

the system will do this (note the dates)...

Annual — doesn't technically matter
Annual is the only accrual that won't be overridden by a last accrual.

The only thing that determines an Annual accrual date is the "This Year's Start Date" (TYSD). Because that involves using the PTO Balances page, finish all other accrual/balance adjustments before tackling annual schedules.
However, you can still enter a manual accrual if the employee has an existing balance.

then next year...

Part 2: What Hours Earned to Enter
If the employee has a balance, enter the current balance: 
If the employee has a 0 balance, enter an accrual of 0: 
If the employee has a negative balance, enter the negative number: 
Part ∞ : Adjusting Balances Later…
If you need to add a manual accrual later, but don’t want to alter the schedule, make sure to repeat the last accrual date or enter a date before the last date listed.

More about the PTO Accrual Edit page...
![]()
Delete and Recalculate — Beware! This will delete ALL accruals (including manually added ones) and will start accruals over from the beginning of the current year. This means if you have accruals from years past, this tool will delete them!
![]()
Populate Automatic Accrual — This setting is what populates the accruals on the page. If unchecked, it will recheck itself once you leave the page. It can be helpful if you need the system to not populate accruals while you're working on adjusting the schedule.
Back to the PTO Balances page...
Features menu: PTO Balances
Now that you’ve adjusted accruals and balances, you’ll see values on the PTO Balances page, and it should be safe to work on this page (if needed).

This Year's Start Date (TYSD)
This setting is very important, although most Admins don’t need to alter it. January 1 is recommended.
What TYSD tells the system to do:
- Start new accruals on this date (unless overridden with the Accrual Edit page)
- Post Annual accruals on this date
- Apply or remove carryover and start a new year on this date
Why the TYSD Should Stay January 1
Generally speaking, the TYSD should only be a different date if...
- it's an Annual accrual that should post on the employee's anniversary or birthday.
- the company uses a different date to mark the fiscal year.
This Year's Carryover (TYC)
This Year’s Carryover (TYC)
This is where the unused hours from the year before post as carryover. Every year, this number is replaced with new carryover. If employees shouldn’t have received carryover, it can easily be replaced with 0’s… but don’t forget to adjust the rule for carryover in the PTO Assignment and Accrual page.
Start Using Date (not commonly used) — Only necessary if employees will start accruing hours for a period before being allowed to use them.
Advance Allowed (not commonly used) — Allows employees to enter more PTO than what they have available. Whatever value is entered is how far into the negative their balance can go.
Earned After Start Date — Amount of hours that have been accrued since the TYSD (not including carryover)
Used After Start Date — Amount of hours that have been used since the TYSD
Available — Employee’s current PTO balance.
This is calculated: Carryover + Earned After TYSD – Used After TYSD = Available
FAQ
Where can I go to look at all employee balances?
The best place to see all balances at once is the PTO Balances page in the Features menu.
Can employees enter their own PTO?
By default, employees cannot enter PTO. For them to have this access, they would either need to be given Edit Access or Change Request (Setup menu: Access) or the PTO Menu (Features menu: PTO Categories). This is covered further in the next section.
How can I make PTO time non-exempt (count toward overtime)?
In PTO Categories, choose Included under Include in OT Calculations.
Why do my employees have a bunch of accruals of just 1 hour?
This happens when you have only partially set up the accrual settings, and then either left it overnight or saved changes on the PTO Balances page. In this case, you can use the Delete and Recalculate option in the PTO Accrual Edit page. This step will need to be taken for every employee and category that applies.
If I have a requirement for employees to work X amount of hours in a week in order to receive an accrual, does the system count PTO usage toward that requirement?
(or)
If employees accrue a fraction of an hour for every hour they work, is PTO included as hours worked?
By default, no. But when using either of these settings, a column is activated in the PTO Categories page titled Accrue While Using. Changing the option to Yes will tell the system to consider PTO as hours worked.
My employee has moved from one category of Vacation to another, but has a balance still in the old category. What do I do with that old balance?
We suggest having the employee use the hours from the old category before using hours from the new one. However, if needed, you can use the PTO Accrual Edit page to create a negative accrual for the amount left in the old category to bring the balance to 0, then add the extra hours as an accrual in the new category.
Watch Video:
